User Manual EVX230
EVERET EVX230 NDI®|HX3 PTZ Camera 30x

Before Use
- The EVERET EVX230 is a premium NDI®|HX3 full HD remotely controllable PTZ camera with 30x Zoom. Equipped with superior Ambarella ISP chipset, professional 1/1.8″ SONY CMOS sensor and 30x optical zoom lens to capture every detail even in low-light conditions.
- Before operation, please fully read and follow all instructions in the manual.
- The camera power input range is 100-240 VAC (50-60Hz), ensure the power supply input is within this rate before powering on.
- The camera power voltage is DC12V/10W. We suggest you use it with the original power supply adapter or use PoE+ (IEEE802.3at) compatible switch.
- Please keep the power cable, video cable and control cable in a safe place. Protect all cables especially the connectors.
- Operational environment: 0℃-50℃, humidity less than 90%. To avoid any danger, do not put anything inside the camera, and keep away from the corrosive liquid.
- Avoid stress, vibration and damp during transportation, storage and installation.
- Do not detach the camera housing and cover. For any service, please contact authorised Everet technicians.
- Video cable and control cable should be individually shielded, and cannot be substituted with other cables.
- Do not direct the camera lens towards strong light, such as the sun or the intensive light.
- Use a dry and soft cloth to clean the camera housing applied with neutral cleaning agent when needed. To avoid damage on the camera lens, never use strong or abrasive cleaning agents on the camera housing.
- Put the camera on fixed and smooth desk or platform.
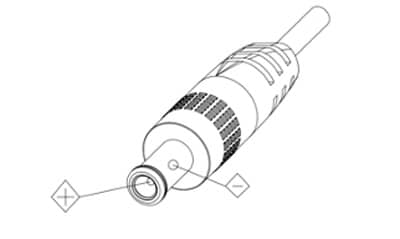
- Power Supply Polarity (Drawing).
Note: The video quality may be affected by the specific frequencies of electromagnetic fields.
Warnings
- The video quality may be affected by the specific frequencies of electromagnetic fields.
- Never grasp the head of the camera, and never move the camera by hand when it is working, otherwise, mechanism maybe destroyed. See picture below.

Packing List
Check all bellow items when you open the package:
| Camera | 1 |
| Power Adapter | 1 |
| Power Cable | 1 |
| Support Reference Card | 1 |
| RS232 Control Cable | 1 |
| USB Type-C to USB-A Cable | 1 |
| IR Remote Controller (2x AA batteries required, not included) | 1 |
Network Security
If you will use the camera connected to a network, your attention is asked. It is your responsibility to take precautions such as subscribed below to protect against network security risks.
- Avoid network connections using public lines
- Use the camera in a network secured by a firewall
- Protect your network against unauthorised access by restricting users to log in with an authorised user name and password.
- Change the administrator password periodically.
- After accessing the camera as an administrator, be sure to close all web browsers.
Recommended Network Switches
POE+ Switch Requirements:
(POE+ IEEE 802.3af/at compliant with total power of 126W up to 30W
Example recommended unmanaged POE+ network switches:
- 8-port: TL-SG1008MP
- 8-port: NETGEAR GS110TPP PoE+ Smart Switch
- 16-port: NETGEAR GS716TPP PoE+ Smart Switch
- 24-port: NETGEAR GS724TPP PoE+ Smart Switch
Example recommended managed POE+ network switches:
- 8-port: NETGEAR GSM4212P AV Line M4250-10G2F-PoE+
- 24-port: NETGEAR GSM4230P AV Line M4250-26G4F-PoE+
- 40-port: NETGEAR GSM4248P AV Line M4250-40G8F-PoE
Default Settings
| IP Address | 192.168.1.188 |
| Camera IR Remote Control address | CAM 1 |
| Video output resolution | |
| HDMI | 1080P30 |
| 3G-SDI | 1080P30 |
| WebUI | |
| Username | admin |
| Password | admin |
Dip Switches
| DIP-switches | ||||||
| Mode | SW-1 | SW-2 | SW-3 | SW-4 | SW-5 | SW-6 |
| Working mode | ON | ON | ON | ON | ON | OFF |
| Upgrading mode | OFF | OFF | ON | ON | ON | OFF |
Quick Start Guide
- Check if following products are in the box
– Camera
– DC12V Power Adapter
– Power Cable
– IR Remote Control - Check all cable connections before power on.
Power on the camera with the included 12V Power Adapter or use a POE+ switch
POE+ Switch Requirements:
(POE+ IEEE 802.3af/at compliant with total power of 126W up to 30W per port) - Check if you get video output from HDMI or SDI on a display.
NOTE: The default resolution of the camera is 1080P30. If your display does not support this resolution you can easily change the resolution with the IR remote control. Please go to chapter: IR Remote Controller in this manual and follow instructions ‘Change video output Resolution for SDI, HDMI and USB3.0′ on how to do this. - Check if you can Pan and Tilt the camera with the IR remote controller.
NOTE: if you cannot pan or tilt the camera. Please go to chapter: IR Remote Controller in this manual and follow instructions ‘SET Camera 1-4’ on how to do this. - Please check the default camera IP adress (192.168.1.188) for operation in your network or simply change IP adress in OSD menu settings using IR remote controller. Please go to chapter ‘OSD Menu’ and follow instructions ‘Change IP address’ how to do this.
- In the basic settings, focus, iris and white balance will be adjusted automatically (factory setting)
How to turn Power On or Off
- Set all the power switches of the camera and devices connected to ON
- The camera does not have a power switch. When power is supplied to it, the status display LED will light up red.
- If you use POE power please check the switch is supporting POE+
(PoE+ IEEE 802.3af/at compliant with total power of 126W up to 30W per port) - Press red button on the IR remote control to start self-configuration
- Press the [ON/STANDBY] red button on the remote control for 2 seconds, the camera will enter standby
Key Features
- Sony STARVIS IMX334LQR 1/1.8 inch 8.42 MP UHD CMOS sensor
- Superior High Performance American Ambarella ISP chipset
- NDI®|HX3 Support
- 30X Optical Zoom
- Get video, PTZ control, tally and power supply with one CAT5/6 cable
- Compatible via NDI version 5.5
- Smooth pan-tilt-zoom
- Automatic NDI® tally support
- Support for HD video formats up to 1080p60
- Superior Video Quality
- Efficient Bandwidth
- Low Latency
- 59° Field of View
- HDMI, UVC USB, 3G-SDI compatible with Blackmagic Design SDI Level-B
- IP Streaming – RTSP/ RTMP/SRT/NDI®|HX
- Audio in connector
- Flexible Mounting options
- Available in Black and White colors
- 3-Year Warranty
- Webbased UI for easy setup, preview and control
- One-click firmware upgrades
Specifications
| Camera | EVX230 |
| Sensor | Sony STARVIS IMX334LQR 1/1.8 inch 8.42 MP CMOS sensor |
| Color Space | 8bit RGB 4:4:4; ISP RAW (12bit) |
| Video | |
| Video interface | HDMI 2.0 / 3G-SDI* / USB 2.0 (type-c) / RJ45 (IP) *Level A and B |
| Video Encoding | H.264/H.265 |
| Streaming Protocols | NDI®|HX3 / RTMP / SRT / RTSP |
| Bitrate control | Variable or Constant |
| Video Bitrate | 1024Kbps ~ 61440Kbps |
| I-Frame Interval | 1 – 120 |
| Audio | |
| Interface | 3.5mm Line-in |
| Samplerate | AAC: 16000Hz – 48000Hz LPCM: 11025Hz – 48000Hz |
| Bitrate for AAC | 32000Kbps – 128000Kbps |
| Volume | 1-100 |
| Video format | |
| HDMI | 1920x1080P60/50/30/25/59.94/29.97/24/23.98 1920x1080I60/50/59.94 1280x720P60/50/30/25/59.94/29.97 |
| 3G-SDI | 1920x1080P60/50/30/25/59.94/29.97/24/23.98 1920x1080I60/50/59.94 1280x720P60/50/30/25/59.94/29.97 |
| USB 2.0 (type-c) | NV12: 1024x576P24 800x480P30 YUYV: 1024x576P18 800x480P27 MJPG: 1920x1080P60/50/30/25 1280x720P60/50 1024x276P60/50; 800x480P60/50 H264 /H265: 1920x1080P60/50/30/25 1280x720P60/50 1024x576P60/50 800x480P60/50/30 |
| NDI®|HX3 / RTMP / SRT / RTSP | Main Stream 1920×1080@15~60 1280×720@15~60 1024×576@15~60 Sub Stream 640×360@30 |
| Lens | |
| Optical Zoom | 30x |
| Digital Zoom | 4x |
| Aperture | F1. 35(Wide) – F4.6(Tele) |
| Focal Length | 6.91 ~ 214.64 mm |
| Horizontal Viewing Angle | 60° (Wide) – 2°(Tele) |
| Vertical Viewing Angle | 34.14°~1.12° |
| Diagonal Viewing Angle | 67.08°~2.27° |
| PTZ | |
| Speed by Zoom | ON/OFF |
| Pan/Tilt rotation range | Pan: -170° ~+170° Tilt: 30°~+90° |
| Pan/Tilt rotation speed | Pan: 0.1°~80°/s Tilt: 0.1°~60°/s |
| PTZ Freeze | Yes |
| Pan & Tilt Speed | 5 – 24 |
| Zoom Speed | 1 – 7 |
| Presets | IR Remote : 10 WebUI: 128 EVKB200N: 128 Serial: 128 |
| Save AE & WB settings in preset | ON/OFF |
| Preset Speed Pan & tilt | 5 – 24 |
| Preset Speed Zoom | 1 – 7 |
| Image | |
| Shutter Speed | 1/1 – 1/10000s |
| Iris | F1.8 – F14 |
| Minimum Object distance | Wide: 1.5m~INF; Tele:1.5m~INF |
| Video S/N Ratio | >50dB |
| Minimum Illumination | 0.1 lux |
| Focus | Auto / Manual / One Push Auto Focus |
| Gain Level | 0-30Db |
| White Balance Modes | Auto / Manual / Auto Tracking / One Push / Indoor / Outdoor / Color Temperature |
| Exposure Modes | Auto / Manual / Shutter Priority / Iris Priority / Brightness Priority |
| Wide Dynamic Range Level | Levels 1-6 |
| Gamma | Levels 0-8 |
| Anti-Flicker | OFF / 50Hz / 60Hz |
| 3D NR | OFF / Auto / Level 1-4 |
| 2D NR | Yes |
| Image Flip | Yes |
| Image Mirror | Yes |
| Back Light Compensation | Yes |
| Tally Light | Yes |
| Control | |
| Network (RJ45) | NDI / HTTP / ONVIF / VISCA over IP (TCP&UDP) / HTML5 (WebUI) |
| Serial | RS232 / RS422 / RS485 / PELCO P/D |
| IR Remote | Yes |
| Daisy Chain | Yes, up to 7 cameras |
| USB | USB2.0 (UVC1.1) |
| Visca over IP Port | 52381 |
| NDI Port | 5961 |
| Network | |
| Default IP | 192.168.1.188 |
| Port Speed | 1 Gb/s |
| PoE | POE+(IEEE802.3at) |
| DHCP | Yes |
| Multicast | Yes |
| NDI Discovery server | Yes |
| HTTP Port | 80 |
| RTSP Port | 554 |
| RTSP Encrypt | Yes |
| General | |
| Environment | Indoor |
| Operating Temperature | -10℃~50℃ |
| Operating Humidity | ≤80% |
| Power input | DC12V/POE+(IEEE802.3at) |
| Power Consumption | PoE+ : 10W DC in: 10W |
| Dimensions (LxWxH) | 205mm×165mm×191,8mm |
| Weight | 2 KG |
| Color | Black/White |
| EAN EVX230 | 8720387387298 |
| EAN EVX230W | 8720387387304 |
Connections

| 1. | Camera Lens | 6. | Tripod Screw hole “1/4 | 11. | USB Type-C (OUT) |
| 2. | Camera Base | 7. | Installation Holes | 12. | HDMI Port |
| 3. | IR Receiver | 8. | RS232 (IN) | 13. | 3G-SDI Port |
| 4. | Power indicator / Tally | 9. | RS232 ( OUT) | 14. | RJ45 / IP / NDI®|HX3 |
| 5. | DIP-switches | 10. | Line-in | 15. | DC 12V Plug |
IR Remote Control

| Buttons | Description |
 | POWER Short press POWER key to enter standby mode from normal working mode. Press it again, the camera will do self-checking, then go back to HOME position. It will go to preset position if power on mode has been set before. FREEZE Short press FREEZE key to freeze/unfreeze the image. IRT (IR Transfer/IR Pass) Open/Close the IR pass function. Once press the IRT key, the camera will receive and pass the IR remote control signal to the codec/terminal. (via VISCA IN port) |
 | Set 1 ~ Set 4 ADDRESS SETTING Long press for 3 seconds until the key light ON, to set camera address. CAM1 ~ CAM4(CAMERA SELETING) Short press to select the relative camera. |
 | NUMBER KEY (1-9) Set Preset: Long press the number key (3 seconds) to set preset. Run Preset: Short press the number key to run preset. CLR PRE (CLEAR PRESET) CLR PRE+number key:to clear the relative preset. Long press to clear all presets. |
 | FOCUS KEY: +/- Manual focus, only valid under manual focus mode. ZOOM KEY: +/- Set the Zoom rate. NAVIGATE KEY: UP/DOWN/LEFT/RIGHT Under working mode, use navigate key to set the pan tilt, and select menu when enter OSD. OK/ HOME KEY: Under working mode, short press OK to make the camera go back to HOME position; and confirm the selection when enter OSD. |
| AF/M: AUTO FOCUS/ MANUAL FOCUS RESET: Press 3 seconds to reset camera. MENU: Enter OSD menu under working mode. Use as Go-Back function after entering the menu. | |
| LIMIT L/ LIMIT R/ LIMIT CLR: LEARN+LIMIT L: Set the pan tilt left limit position. LEARN+LIMIT R: Set the pan tilt right limit position. LEARN+LIMIT CLR: Clear the limit position. | |
| BLC OFF/ BLC ON: To turn off/on the back light compensation BRIGHT-/ BRIGHT+: Set image brightness, only valid under bright priority exposure mode. | |
 | VIDEO FORMAT KEYS: Long press 3 seconds to select different video format output. |
OSD Menu

- Under working mode, press the MENU key on the IR remote controller, to enter the OSD menu as shown.
- After entering the main menu, use the UP/DOWN keys on the IR remote controller to navigate through the menu. Once selected, the main menu will change to blue background, and the right side will show all sub menu options.
- Press the navigate RIGHT key to enter sub menu; use UP/DOWN key to select the submenu. Use the LEFT/RIGHT key to select parameter.
- Press the MENU key again to return to previous menu. Press the MENU key continuously to exit the OSD menu. Settings that have been changed are automatically saved.
System

| PROTOCOL | VISCA, PELCO-P,PELCO-D | Default:VISCA |
| ADDRESS | VISCA:1~7 PELCO-P/D:1~255 | Default:1 |
| BAUD RATE | 2400,4800,9600,115200 | Default:9600 |
| PTL LOCK | PROTOCOL LOCK: ON/OFF | Default:OFF |
| RS485 | ON/OFF | Default:OFF |
| VISCA | OVER ALL, OVER IP, OVER COM | Default:OVER ALL |
| LANGUAGE | English | Default:English |
Exposure

| EXPOSURE MODE | AUTO, MANUAL, SHUTTER, IRIS, BRIGHT | Default:AUTO |
| SHUTTER | Shutter speed:1/30~1/10000, only valid under MANUAL and SHUTTER mode | Default:AUTO |
| IRIS | Iris setting: CLOSE~F1.8, only valid under manual mode | Default:AUTO |
| GAIN | Gain setting:0dB~30dB, only valid under MANUAL mode | Default:AUTO |
| EXPOSURE BRIGHT | Bright setting: 0~27, only valid under BRIGHT priority mode. | Default: AUTO |
| BRIGHT | Bright setting:0~15 | Default:8 |
| WDR | ON/OFF | Default:OFF |
| WDR Level | WDR Level | Default:1 |
| BLC | ON/OFF | Default:OFF |
Image

| WB MODE | AUTO, INDOOR, OUTDOOR, MANUAL, PUSH, ATW, C.T Auto: Automatically detects light in the room and selects the best white balance option for you. Indoor: Preset settings for indoor camera use. Outdoor: Preset settings for outdoor camera use. Manual: You Set the white balance options based on Red and Blue gains. One-Push: Used in conditions where Auto White balance is unable to detect and use a white image to auto set the white balance. Basically, you fill the frame with what you know to be a white object (even under colored lighting), this is saved as the camera’s “white” reference and camera now auto-white-balances using the new reference “white” instead of its internal reference. To trigger the one push press F3 on the IR Remote. ATW: Auto Tracking White Balance ATW is a more dynamic version of AUTO white balance. It detects when your ambient lighting shifts significantly (such as moving from indoors to outdoors) and dynamically changes the AWB for you. C.T: Color Temperature (1800 ~ 10000K) | Default:AUTO |
| R/B GAIN | Red/Blue gain level: 0~255, only valid under manual white balance mode. NOTE: 0db is 100 ISO | 6db is 200 ISO | 12db is 400 ISO | 24db is 800 ISO | Default:AUTO |
| COLOR TEMPERATURE | ONLY VALID UNDER C.T. MODE | Default: Auto |
| FLICK | Anti-Flicker setting:50/60HZ, to reduce the video flicker | Default:50HZ |
| DIGITAL ZOOM | ON/OFF (4x digital zoom) | Default:OFF |
| FOCUS | AUTO/MANUAL | Default:AUTO |
| 3G-SDI | Optional: LEVELA, LEVELB | Default: A |
Quality

| 2D NR | 2D noise reduction: the bigger value, the less noise on image, the lower resolution | Default:OFF |
| 3D NR | 3D noise reduction: OFF/AUTO/1~4, the bigger value, the less motion noise on image, high value will cause image smear. | Default:AUTO |
| SHARPNESS | Sharpness setting: 0~15, the higher value, edge of the image will be sharpened | Default:6 |
| CONTRAST | Set contrast level 1~15 | Default:8 |
| SATURATION | Set saturation 1~15 | Default:8 |
| GAMMA | Select gamma level 1~15 | Default:8 |
| IMAGE STYLE | USER, NORMAL, COLORFULL | Default:USER |
PTZ Settings

| SPEEDBYZ | SpeedByZoom: proportional speed, the bigger zoom, the slower the speed | Default:ON |
| FLIP HORIZONTAL | ON/OFF | Default:OFF |
| FLIP VERTICAL | ON/OFF | Default:OFF |
| PAN TILT SPEED | 5~24 | Default:18 |
| ZOOM SPEED | 1~7 | Default:5 |
| PRESET FREEZE | Preset Freeze function Freeze last preset video image when switching between presets | Default: OFF |
| PRESET PT SPEED | 2~24 | Default: 7 |
| PRESET ZOOM SPEED | 1~7 | Default: 3 |
| PRESET SAVE AE&AW | ON/OFF | Default: OFF |
Video Format

| SIZE | 1080P, 1080I, 720P |
| FRAME RATE | 60, 59.94, 50, 30, 29.97, 25, 24, 23.98 |
| VI FRAME RATE | 60, 50, 30, 25 |
IP Settings

| DHCP | ON/OFF |
| IP | 192.168.001.188 |
| MASK | 255.255.255.000 |
| GATEWAY | 192.168.001.001 |
| MAIN SIZE | Current main stream resolution |
| BITRATE | Current bitrate resolution |
| SUB SIZE | Current sub stream resolution |
| BITRATE | Current sub stream bitrate |
Reset

| SYSTEM RESET | Reset communication parameter to default |
| CAMERA RESET | Reset camera parameter to default |
| PAN TILT RESET | Reset pan/tilt parameter to default |
| ALL RESET | Reset all parameter to default |
Information

| IR ADDRESS | Camera IR control address |
| CLIENT | VISCA |
| MODEL NO. | Model number |
| ARM VERSION | ARM firmware version |
| ISP VERSION | Camera ISP firmware version |
| RELEASE DATE | Software release date |
Webinterface
Login
In order to enter the WebUI of the EVX230 run your commonly used browser (Google Chrome, Firefox, IE, Safari, Opera, 360, QQ etc) and enter the default IP address:
Default IP address: 192.168.1.188
After you have successfully reached the IP address you will be prompt to login like shown in the figure below:

To login use the default username and password as follows:
Username: admin
password: admin
NOTE: The default username and password can be changed in the account settings which will be explained further on in this manual.
Live video preview and control interface
Once you have successfully logged in you will be presented with the live video preview and control interface like shown in figure below:

The preview interface is shown above. On the right side you have to following control options for the camera: Pan, Tilt, Zoom, Focus, Focus mode, Pan Tilt speed, Focus speed, Zoom speed, Preset position control. At the bottom of the live video preview player, you can select the volume switch and volume level, as well as the full-size view and picture-in-picture mode.
NOTE: Any adjustments made to the PTZ Speed in the WebUI will overrule the settings in the camera that are made via the PTZ controller or IR remote control. For e.g., the PTZ Speed is set to 15 in the OSD menu via the IR remote and in the WebUI it is set to 5. When the camera is controlled by the WebUI the PTZ speed will be 5 and when controlled by the IR remote the PTZ Speed will be 15. So, the device that is used to control the camera is the master. Presets are inherited in the camera and can be called from the WebUI, PTZ Controller or IR remote.
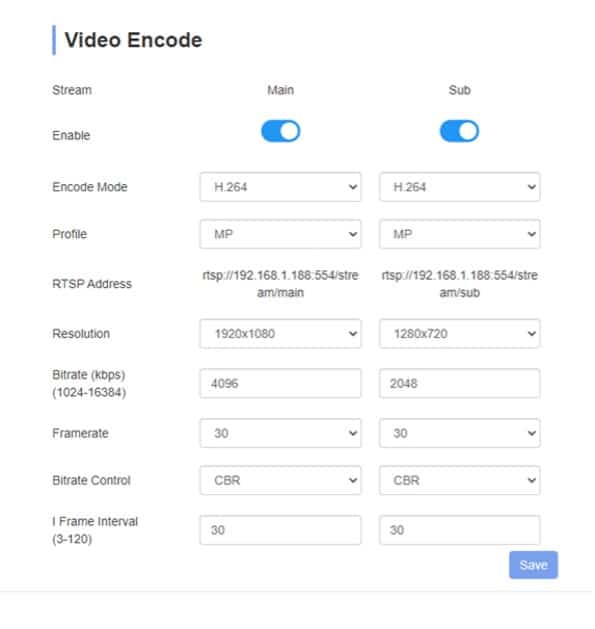
Video Encode Settings

Here you can configure the encoding settings for the RTMP, RTSP, SRT and NDI®|HX2 stream.
- Enable/disable Main or Sub stream.
The main and sub stream are used to stream RTMP, RTSP, Live video preview, ONVIF, SRT and NDI®|HX 2. The main difference between the two is the resolution that can be chosen. The mainstream goes up to 1080p60 while the substream goes up to 720p60.
- Encode mode: H.264/H.265
H.264 and H.265 are both codecs used in video compression. H.264 is more widely used and has been around for longer but H.265 is slowly becoming more popular. The main difference between H.264 and H.265 is the amount of data they can compress. H.264 is able to compress data by around 50%, while H.265 can compress data by up to 75%. This means that H.265 is more efficient at compressing the same amount of data, resulting in a better video quality and smaller file size. Another difference is the level of detail that H.264 and H.265 can handle. H.264 is able to handle more detailed video, while H.265 is better at handling lower resolution video. This means that H.264 is better suited for higher resolution video, while H.265 is better for lower resolution video.
- Profile*: Baseline | MP (Main Profile) | HP (High Profile)
H.264 offers three levels of coding performance: Baseline, Main, and High Profile (HP). Baseline is the most basic of the three, offering reduced data rates and limited features such as support for only mono- or stereo-audio streams. Main Profile (MP) adds features such as interlaced video, B-frames, and support for multiple audio streams. Finally, High Profile (HP) provides even higher data rates and additional features such as scalable video coding and support for multiview video coding.
* Only available when with H.264
- RTSP Address
RTSP, or Real-Time Streaming Protocol, is a network control protocol designed for use in video communication systems to transport video and audio between end points. The RTSP stream can be used to get the live video feed in VLC or other RTSP hardware and software decoders.
- Resolution: chose the encoding resolution.
- Bitrate.
- Framerate
- Bitrate control: Variable or Constant Bitrate
Variable bitrate (VBR) and constant bitrate (CBR) are two methods of controlling the amount of data used to encode audio and video files. VBR is a method of encoding that allows the bitrate to fluctuate according to the complexity of the source material being encoded. It is often used for streaming media, such as audio and video, and is a more efficient way of encoding than CBR. On the other hand, CBR encoding is the simplest and most common method of encoding audio and video files. This method assigns a fixed bitrate to the entire file regardless of its content, meaning that the quality of the file will remain the same throughout. This can be useful for applications in which uniform quality is desired, such as when encoding for broadcast.
- I-Frame interval.
To maintain low latency, we suggest keeping the resolution and framerate the same as your encoding software to prevent unnecessary encoding process. The I-Frame we suggest setting double as high as the framerate unless you are capturing sports or events with lots of movements per second. In that case we suggest keeping it the same as the framerate.
RTMP / NDI®|HX3
Click “Video Transmission” to seefollowing settings as shown in the figure below:

The “RTMP Address” is the streamurl/streamkey for e.g., rtmp://a.rtmp.youtube.com/live2/ jvtx-de4e-j2t0-6jcg-b4vc
The “NDI®|HX3” can be enabled to get audio and video into your live production system. You also have the option to enable “Discovery server” so the camera can be found by the NDI® Discovery server* application. Enable “Multicast” to capture the camera feed into multiple live production systems over the local network.
NOTE: when HX3 is disabled the camera will be running on NDI®HX2
* The NDI discovery service is designed to allow you to replace the automatic discovery NDI uses with a server that operates as a centralized registry of NDI sources. This can be very helpful for installations where you wish to avoid having significant mDNS traffic for many sources. It can also be useful in situations where multicast is not possible or desirable; it is very common for cloud computing services not to allow multicast traffic. When using the discovery service, NDI can operate entirely in unicast mode and thus in almost any installation. The discovery server supports all NDI functionality including NDI groups.
SRT
The EVX230 supports SRT (Secure Reliable Transport) which is a real-time streaming protocol developed by Haivision, a video streaming company. It is designed to reduce latency and provide secure, reliable, and high-quality streaming of audio and video over the public internet. It is based on the UDP protocol and uses AES encryption for security. SRT is optimized for mobile networks and can adjust itself to changes in network conditions, such as packet loss and jitter. It can also handle high bandwidths and low latency, making it ideal for streaming applications. The camera can act as listener or caller. We shall explain both scenarios below.
Select “listen” in the SRT setting to see following settings as shown in the figure below:

Mode: Listen
Enable: enable or disable SRT stream by clicking on the “switch button”
Port: Select through which Port you want to send the SRT stream. Make sure that the caller side has the same port number.
Encryption: Enable to secure stream with a password.
Key Length: Indicates the specified key length for AES encryption.
Passphrase: fill in the password
Main/sub stream: On the caller side you need the fill in the stream ID that you want to use.
NOTE: On the caller side you only need to fill in r=0 (mainstream) or r=1 (substream) not the entire URL.
Select “Caller” in the SRT setting to see following settings as shown in the figure below:

Mode: Caller
Enable: Enable mainstream and/or substream
IP: Fill in the IP address of the listener side for both main and substream
Port: Fill in the portnumber on the listener side for both main and substream. Make sure that the sub and mainstream have different portnumber when they both are enabled.
Encryption: Enable encryption
Key length: Indicates the specified key length for AES encryption.
Passphrase: fill in the password
Streamid: fill in Mainstream: r=0 | Substream: r=1
Audio Settings
The EVX230 offers two ways of audio encoding AAC and LPCM, which we will further explain in this section.
AAC (Advanced Audio Coding) and LPCM (Linear Pulse Code Modulation) are two different digital audio formats. AAC is a lossy audio format, meaning that some audio information is lost during the encoding process, while LPCM is a lossless audio format, meaning no audio information is lost.
AAC offers superior audio quality at a lower bitrate than LPCM, making it the preferred choice for streaming services and other applications where bandwidth is limited. It also has greater compatibility with different devices, as it is supported by a wider range of audio players. On the other hand, LPCM is the preferred choice for archiving purposes, as it offers a higher fidelity and does not suffer from the same compression artifacts of AAC.
Select “AAC” Advanced Audio Coding to see the following audio settings:

Select “LPCM” Linear Pulse Code Modulation to see the following audio settings:

Camera Settings
In this part we shall go further into details about the camera settings that you can adjust directly from the WebUI. After you have successfully logged in and navigated to settings, you’ll find on the left side the option “Image Adjust”. Click on it to see the camera settings as shown in the figure below:

The first parameters that can be configured are the ‘Focus’ and ‘Digital Zoom’
Focus mode: The focus mode can be set to ‘Auto’ or ‘Manual’.
Auto focus
If the camera is being used in an environment where there is not much movement and the scene is quite consistent, then we suggest keeping the focus on auto. The camera will automatically focus on the main person or object in the field of view.
Manual focus
In some situations the operator wants to focus on specific objects, persons, details etc. In this case it is convenient to use ‘Manual focus’. The camera will then accurately focus on what you’d like to put in the spotlight of your production. Furthermore, the manual focus can also be saved in the preset.
Digital Zoom: The EVX230 has 4x Digital Zoom. The Digital Zoom can either be enabled or disabled.
Digital Zoom
The Digital Zoom is used in specific situations where the 30x Optical Zoom of the camera is not enough. It should be considered that Digital Zoom zooms in on a certain portion of the image. That part is then enlarged to the total number of megapixels your camera sensor has. So, in effect, a piece of the image is cut out and resized. Which will result in less image quality.
Exposure
Click “Exposure” to see settingsas shown in the figure below:

Exposure is the amount of light that is allowed to pass through the camera’s lens. It affects the brightness and contrast of the image and can be adjusted manually or automatically. Exposure is typically set in terms of shutter speed and aperture (Iris). Shutter speed is the length of time the camera’s shutter is open and allows light to enter the camera, while aperture (Iris) is the size of the camera’s lens opening. The combination of the two determines the amount of light that is let in and affects the exposure of the image.
Exposure modes: Auto / Manual / Iris Priority / Shutter priority / Brightness Priority
Auto
When the camera is in AE (Auto Exposure) mode the camera will regulate the all the exposure settings itself to create the best image.
Manual
In manual mode you are free to change the exposure settings as you like. You’ll be able to manage the Shutter, Iris and Gain of which we will further explain their functions.
Iris Priority
In Iris priority mode only the camera’s aperture can be controlled which is another important factor in controlling exposure. Aperture is the size of the lens opening and affects the amount of light that passes through the lens and falls onto the image sensor. A wide aperture allows more light to enter the camera, resulting in brighter images. A smaller aperture reduces the amount of light entering the camera, resulting in darker images. The EVX230 Aperture ranges from 1.8~14. The lower the number, more light will be allowed to pass through the lens.
Shutter Priority
In shutter Priority mode only the shutter can be enabled. To choose the right Shutter speed you can use the 180 rule. The 180 degree shutter rule is a popular guideline among video makers for setting the shutter speed for proper exposure. It states that the shutter speed should be set at double the frame rate of the video being shot. For example, if a filmmaker is shooting video at 30 frames per second, the shutter speed should be set to 1/60th of a second in order to achieve proper exposure. This shutter speed creates a shutter angle of 180 degrees, hence the name of the rule. This rule has become a standard in the film industry to match what the human eye is used to seeing in real life.
Gain: Enabled in “Manual” mode
Gain is an electronic light amplification of the video signal. This means that the light is boosted electronically, adding more voltage to the pixels on your image causing them to amplify their intensity and therefore brighten your image. This will result in a brighter image in conditions that wouldn’t normally allow it, like when there is insufficient light. The contrary of Gain is noise. The higher the Gain is set the more noise will occur.
Brightness: Enabled in “Brightness Priority” mode.
Brightness is a term used to describe the overall light intensity of the image and is used to adjust the overall level of brightness of the image.
NOTE: Gain and brightness are both terms that are used to describe the intensity of the light or image. Gain is more closely associated with increasing the intensity of the signal, whereas brightness is more closely associated with adjusting the overall light intensity of the image. Gain is used to increase the intensity of the light or image, whereas brightness is used to adjust the overall level of brightness of the image.
Anti-Flicker (60Hz/50Hz): Only adjustable in “Auto and Iris Priority” mode.
Anti-Flicker is a feature that helps reduce or eliminate flickering images caused by fluorescent or other artificial lighting sources. It works by adjusting the shutter speed to match the frequency of the artificial light source. This helps to reduce the amount of flickering that occurs in the images.
White Balance
The third parameter that can be configured is the “White Balance” as shown in the figure below

White balance is essentially the process of adjusting the colors in an image so that all colors appear as they should. This is done by compensating for the different color temperatures of light sources, such as natural sunlight, incandescent light bulbs, and LED lights.
White Balance Modes: Auto / Indoor / Outdoor / One Push / Auto Tracking / Manual / Color Temperature.
Auto
When the camera is set to auto white balance settings, it assumes that the light source is a neutral white. This means that the colors in the scene will be rendered accurately. However, if the light source is not neutral white, then the colors in the scene may be rendered inaccurately. In that case, the white balance settings should be manually adjusted to ensure that the colors in the scene appear as they should.
Indoor
Indoor white balance is a term used to describe the process of adjusting the colors of an image to accurately reflect the colors of the original scene. This is important for any image taken indoors because the lighting conditions are often much different than those outside. Without some form of white balance, images taken indoors can appear too yellow, orange, or blue because of the different types of lighting used.
Outdoor
Outdoor white balance is a setting that adjusts the color balance of the image to account for the brightness of the sun. This setting helps to ensure that the colors in the video image are accurately reproduced. This white balance mode should be used when shooting in natural light, as it can help to reduce the blue or yellow cast that can occur when shooting in direct sunlight. Additionally, outdoor white balance can help to reduce the amount of noise in the video image, resulting in a more vibrant and accurate image.
One Push
One Push White Balance is a feature that allows users to easily set their white balance settings. This feature uses the camera’s auto white balance system and allows the user to adjust the white balance settings with a single click. This is useful when shooting in different lighting conditions, such as indoor and outdoor, as it ensures that the images and videos produced will be accurately colored. The One push can be triggered by using a gray card or white sheet of paper and by pressing the “push” button next to the WB mode selection. With the IR remote you need to press F3.
Auto Tracking
ATWB is especially useful when shooting in mixed lighting conditions, where multiple light sources are present in the scene. Without ATWB, the camera would have to be manually adjusted for each light source in the scene, which can be time-consuming and difficult. With ATWB, the camera can automatically adjust the White Balance for each light source, resulting in consistent and accurate color reproduction. ATWB can also be used to correct color casts that may be present in an image. For example, if a scene has an overall yellow-ish cast, ATWB can be used to adjust the White Balance and correct the color cast.
Manual
In manual mode the Red and the Blue gain can be adjusted to create ultimate color conditions.
Color Temperature
Color temperature is a measure of the hue of a particular light source and is expressed in degrees Kelvin (K). In color theory, color temperature is used to describe the warmth or coolness of a particular color. Colors are typically described as either warm (red, orange, yellow) or cool (blue, green, violet). The higher the color temperature, the cooler the color. For example, a bright white light has a high color temperature, while a warm yellow light has a low color temperature. The Color temperature mode is used to adjust the white balance. Adjusting the color temperature can make a scene look more natural or can be used to create a particular mood or atmosphere. For example, a warmer color temperature will create a more relaxed atmosphere, while a cooler color temperature will create a more energetic atmosphere. The color temperature can only be adjusted in “Color Temperature)” mode (2500~10000).
Image
In the fourth section of the camera settings, you can adjust the parameters as shown in the figure below. We shall further explain each one.

Mirror
When mirror is enabled the video image will be mirrored. Default this mirroring is disabled.
Flip
When Flip is enabled the video image will be shown upside down. This is used in situations where the camera is mounted upside down to the ceiling.
BLC (Backlight Compensation)
Backlight compensation adjusts the exposure to compensate for overly bright background light. It is used to ensure that the main object is properly exposed and not lost in the shadows due to the intense background lighting. Backlight compensation works by increasing the exposure of the foreground and allowing more light to hit the object. This setting can be enabled or disabled.
Gamma
Gamma is a setting that adjusts the contrast of an image. It is typically used to make subtle adjustments to the midtones and shadows of an image. It is an important tool to fine-tune the overall look of an image. When adjusting the gamma of a camera, the result is a change in the level of brightness of midtones and shadows. If the gamma is too high, the overall image may appear washed out and lack contrast. If the gamma is too low, the image may appear too dark and lack detail in the midtones and shadows.
D-WDR
D-WDR (Directional Wide Dynamic Range) is a type of image processing technology that is designed to improve the video image quality in scenes with high contrast. It does this by increasing the dynamic range of the scene. This allows the camera to capture more details in both the light and dark areas of the scene resulting in a better range of detail and texture to be captured. Using D-WDR technology can help reduce the amount of noise and grain present in video images taken in low light conditions.
NOTE: The main difference between WDR (Wide Dynamic Range) and Gamma is how they affect the lighting in a scene. WDR is a technique that is used to capture both bright and dark areas of a scene simultaneously, while Gamma is a method of adjusting the brightness, contrast, and color of an image.
Image Quality
In this section of the camera settings, you can adjust the overall image parameters as shown in the figure below. We shall further explain each one.

Brightness
Brightness is a term used to describe the overall light intensity of the image and is used to adjust the overall level of brightness of the image.
NOTE: when the exposure settings are in “Manual” or “Brightness Priority” mode the brightness option is disabled. The brightness can then be configured in the exposure settings.
Sharpness
The camera sharpness is a measure of the quality of an image that is captured. It is determined by the level of detail that is present in an image, as well as the clarity of the image. A sharp image will have crisp edges and accurate color representation, while a blurry image will appear soft and may not have accurate color representation. You can adjust the level of sharpness according to your video scene.
Contrast
Camera contrast It helps to make the video image more dynamic and interesting. It refers to the difference in brightness between different parts of the image. A higher contrast video image brings out more details and textures combined with intense dark and light areas, while a lower contrast video image will have a more subtle and calming effect.
Saturation
Saturation is the density of a color. Higher saturation makes the colors appear richer, while lower saturation makes it appear paler.
Noise Reduction
In this section of the camera settings DNR (digital noise reduction) can be applied. DNR is technology that can help eliminate or reduce noise effectively and efficiently. There are two primary methods used to reduce noise in a video image: 2D and 3D. We shall explain both.

2D Noise Reduction: Enable / Disable
2D digital noise reduction is the simplest way to reduce video noise. It uses the temporal method for reducing noise. It compares pixels and removes ones that don’t appear in every frame. These irregular pixels are considered image noise. 2D Noise Reduction works best with low-resolution footage. With higher resolution footage, this method is virtually ineffective. While effective, this form of noise reduction can blur images or leave movement trails.
3D Noise Reduction: Enable or Disable / Auto / 1~4
3D digital noise reduction uses an algorithm to compare pixels in a sequence of frames. First, it analyzes the pixels in each frame, and then it compares the frames to see which pixels move or change. It is highly effective at isolating pixels considered noise and generally better at eliminating that grainy look common with low-light video. 3D is also the better choice for videos with lots of motion because it does not create motion blur like 2D DNR. Additionally, 3D DNR works well on high-resolution footage, whereas 2D does not.
Video Output
Click “Video” to see settings as shown in the figure below:

VI Framerate: VI is the frame rate of the front end collected by the sensor and then output to each interface after processing by ISP. When the collected frame rate is 50 frames and the camera outputs 50 or 25 frames, the video will not lag, but if the camera outputs 60 or 30 frames and the VI is 50 frames it will create lag. So, the VI Frame rate should be matching with video output.
Digital output: Select output resolution for HDMI and 3G-SDI
Network Settings
Click “Ethernet” to see settings as shown in the figure below:

DHCP: Enable/Disable
Enable DHCP if the camera is connected to a DHCP router that dynamically grants an IP address, netmask, gateway, and DNS. When DHCP is disabled, you would need to manually set the IP address, netmask, gateway, and DNS.
HTTP Port:80
This is a standardized Port number to communicate between webclients and webservers. We suggest not to change this unless you have specific reasons.
RTSP Port: 554
This is the communication port used to stream the RTSP stream to any RTSP receiving hardware or software. We suggest not to change this unless you have specific reasons.
RTSP Encrypt: Secure RTSP Stream with the Username and Password of the WebUI.
Visca over IP: 52381
This is the port number used to communicate PTZ commands over IP. This important if you want to control the camera with our Windows controller application, PTZ Controller and Bitfocus Companion.
Firmware Upgrade
Click “Firmware Upgrade” to see informationas shown in the figure below:

How to upgrade
Click “select file” icon, to open dialog box, select to open the file. First upgrade the ARM file and then the ISP file. Click “upgrade” to start the upgrade process. Only use upgrade files provided by Everet technicians or support website.

Note: DO NOT power off or take other actions during the upgrade process, the camera will reboot automatically when the upgrade is finished. Afterwards login into webinterface and select “reset all” to reset the camera completely. FW Upgrade is not possible on a MAC only Windows.
Reset
Click “Reset” to see reset options as shown in the figure below:

Account Settings
Click “Account” to change account settings as shown in the figure below:

System Time Settings
Click “System Time Settings” to see configure options as shown in the figure below:

Trouble Shooting
In this section we will describe solutions for common situations you may encounter while using the Everet EVX230. If you have questions, please refer to related chapters and follow all the suggested solutions. If the problem still occurs, please contact us via support@everetimaging.com or login on our website and fill in the form in the support arrea.
| Situation | Solution |
| Power | |
| Camera doesn’t power on with DC12V Adapter | Check DIP-switches on the bottom SW1-5 should be on and SW6 should be off.Check if you have power on other products. Check if the plug is well connected.Check if you are using the DC12V adapter that came in the box. |
| Camera doesn’t power on with PoE Switch | Please use switches that are: POE+ IEEE 802.3af/at compliant with total power of 126W up to 30W Example recommended unmanaged POE+ network switches: – 8-port: TL-SG1008MP – 8-port: NETGEAR GS110TPP PoE+ Smart Switch – 16-port: NETGEAR GS716TPP PoE+ Smart Switch – 24-port: NETGEAR GS724TPP PoE+ Smart Switch Example recommended managed POE+ network switches: – 8-port: NETGEAR GSM4212P AV Line M4250-10G2F-PoE+ – 24-port: NETGEAR GSM4230P AV Line M4250-26G4F-PoE+ – 40-port: NETGEAR GSM4248P AV Line M4250-40G8F-PoE+ |
| IR Remote Control | |
| There is no response from the camera to IR Remote control. | Point the IR to the camera you would like to configure.Long press the SET1 button for 3 seconds until the key light of one of the CAM buttons starts flickering red. When that happens let go of the SET button you were pressing and short press CAM1 button to configure |
| Video output | |
| There is no output image through 3G-SDI and HDMI. | The camera has a default resolution of 1080P30. Some displays don’t support this resolution. Please check. Change the resolution to 1080P50 via IR Remote control by pressing the blue buttons as shown in figure below. |
| Network | |
| Camera can’t be reached by entering default IP address 192.168.1.188 in the web browser. | Make sure your laptop or PC is connected to the same switch/network as the cameraCheck via OSD menu at IP settings if the camera IP address is still 192.168.1.188Check Netmask: 255.255.255.000Check Gateway: 192.168.1.188 If the camera is still unreachable set the camera via OSD menu to DHCP, reboot and check the new IP address. If the camera didn’t get a new IP address, please change the IP address of your laptop or PC into the same range of the camera. For e.g., IP address camera is 192.168.1.188 PC or Laptop should be 192.168.1.100 |
| WebUI | |
| Forgot username and password | Please use following login credentials Username: admin Password: 87866138 |
| Preview doesn’t show any image | Click “settings” and check if the substream and/or mainstream is enabled. |
| FW upgrade doesn’t work on my MAC | FW Upgrade is not possible on a MAC only Windows. |
| NDI | |
| NDI®|HX stream isn’t being processed in vMix when H.265 is enabled. | The Everet cameras support encoding NDI with H.265. Please follow instructions below if you are using vMix. If you are using windows you need to download the HEVC APP from the MS store first. 1. Install the NDI Tools with the NDI version you wish to use. https://www.ndi.tv/tools/#download-tools 2. Locate the runtime directory and copy Processing.NDI.Lib.x64.dll to the desktop. In the case of NDI 5.5 this will be the following: C:\Program Files\NewTek\NDI 5.5 Runtime\v4 3. Rename the file on the desktop to Processing.NDI.Lib.dll 4. Copy the file into the C:\Program Files (x86)\vMix\ndi\x64 directory, replacing the existing file. 5. vMix will now use the updated NDI version. NOTE: These steps will need to be repeated each time the vMix version is updated, as it will overwrite the file each time. |
Getting Started with NDI
NDI is registered trademark of NewTek, Inc.
Getting started with Everet Pro Grade PTZ cameras with NDI® is equivalent to adding connected devices to your network. Simplifying setup for live streaming systems Everet supports PoE, high quality 4K video, tally and control using a standard gigabit enabled network and native integration of industry standard video software including Wirecast, xSplit, OBS, vMix, Livestream studio, Tricaster and more.
The auto-discovery allows NDI® users to span a network by name. When you’re using an NDI® product, you don’t need to memorize IP or port addresses. When you go into a TriCaster or vMix just select ‘the NDI source,’ the system will automatically tell you what PTZs are available within your network- similar to how your phone would connect to a wifi or Bluetooth source. This could be a mixture of cameras- agnostic to the manufacturer- all connecting to your switcher through NDI.
NDI Tools
https://www.ndi.tv/tools/#download-tools
There are a handful of free NDI® applications for MAC and Windows that will help in your production workflow. Here are a few to the most commonly used NDI® tools:
NDI® Studio Monitor
View or display any number of NDI video sources across your network. Incredibly powerful and versatile, NDI Studio Monitor runs on any compatible laptop or workstation, and allows you to see any available NDI channel in real time, arrange multiple NDI channels for live monitoring, and deploy instances for a range of professional signage and display applications.
- Independently configurable video source, overlay, and audio per instance
- Launch, distribute, and manage multiple instances from a single device
- Support for control and configuration via compatible mobile devices
- Comprehensive support for multi-monitor video wall and signage installations
- Remote control of PTZ, recording, and configuration for applicable source
- Record NDI files directly from multiple instances NDI Studio MonitorNEW
- Remote control via web serverNEW
- NDI output allows NDI Studio Monitor to act as a router and server for delivery to multiple outboard displays
NDI® Screen Capture
Capture and present the full-screen display, any combination of windows, applications, players, and webcams, or a specific region of interest from any computer—anywhere on your network. NDI Screen Capture transforms any laptop or workstation into a multi-source IP video input device.
- Generate multiple live video sources simultaneously, with selectable audio
- Support for multi-monitor capture, with independent output at up to 60Hz
- Capture all of your system’s desktops in real-time, at full 60Hz or even games at 120Hz or above and with almost no CPU usage
- KVM (keyboard, video, mouse) remote control of any workstation running Scan Converter from NDI Studio MonitorNEW
- Consumes minimal system resources, with no noticeable performance impact
NDI® | Virtual Input
Designate an available NDI source as the video input for popular software applications that support a webcam. With NDI Webcam Input, NDI sources are recognized as standard Microsoft® Windows® video and audio sources, making it possible to elevate your video communications without increasing the complexity of your setup.
- Compatible with Google Hangouts, GoToMeeting, Skype, Zoom, and more
- Supports full frame rate video and audio up to 1080p and 4K UHD at 60 fps
NDI® | VLC Plug In
Present video content and other supported multimedia to the network as IP sources directly from VLC Media Player. The NDI VLC Plugin encodes the output from each instance of the free player to NDI in real time, making media files of virtually any format available for use in your live production.
- Compatible with current and previous versions of VLC Media Player for Windows
- Makes content accessible without transfer, transcoding, or direct connectivity
- Supports encoding of multiple instances of VLC Media Player simultaneously
- Virtual PTZ control for pan and zoom control around VLC outputNEW
NDI® Plug-in for Adobe CC
Design then deliver Adobe Creative Cloud content directly into your workflow from any workstation on your network. NDI for Adobe Creative Cloud is the only software plugin for Adobe’s industry-standard creative tools enabling real-time, renderless playback and preview over IP—right from the timeline—simplifying review and approval, facilitating collaboration, and accelerating live-to-air editing workflows.
- Compatible with Adobe After Effects® CC, Premiere® Pro CC, and more
- Supports full-resolution, real-time video with audio and transparency
- Viewable from any NDI-enabled receiving device, anywhere on the network
NDI® Import I/O for Adobe CC
Import your media files captured and recorded from NDI sources into Adobe Creative Cloud software applications from your local drives or across your network using standard storage systems. Once the NDI Import I/O for Adobe Creative Cloud is installed, all Creative Cloud applications that use video will recognize the NDI files as another media option. Simply apply media to your timelines for editing and animation projects. Because NDI files are time-stamped during recording, complex multi-cam editing is an effortless exercise.
- Compatible with Adobe After Effects CC, Premiere Pro CC, and more…
- Supports full-resolution, real-time video with audio and alpha channel
- Enables synchronized multi-cam editing
NDI® Access Manager
Manage the visibility and accessibility of NDI systems and sources on your network. NDI Access Manager allows you to organize your NDI channels into groups, choose which groups are available to your device, and select which groups can receive your NDI channels—making it easy to determine the availability of NDI channels across your network.
- Configure NDI channels as public or private on your network
- Group NDI systems, devices, and applications to preference
- Connect to and access NDI channels on other networks via IP address
- Connect to and access NDI channels on other networks via IP address
- Advanced tab allows preference for TCP or UDP connections, multicast operation, and optional discovery server supportNEW
NDI® Test Patterns
Send a reference signal to other NDI devices on your network to confirm connectivity and enable audio and video calibration. NDI Test Patterns includes a variety of test patterns and audio tones to ensure accurate color properties and appropriate sound levels.
- Available patterns include color bars, individual colors, and IRE fields
- Selectable audio tones ranging from +4dBU (+0dBVU) to -40dBU (-48dBVU)
NDI® Screen Capture HX
NDI Screen Capture HX is designed to work with a PC’s GPU to capture your screen and make it available as an NDI source on the network – all without the need for costly capture cards. NDI Screen Capture HX’s ground-breaking capabilities enable powerful new workflows for live content creation:
- Full resolution screen capture up to 4K and above, at frame-rates up to 120 Hz or higher
- End-to-end hardware accelerated implementation of NDI|HX including screen capture, color conversion, and video compression
- Using the high-quality dedicated encoding pipeline on NVIDIA hardware. With full control over the video bitrate, it is possible to have perfect image quality while using almost any network – including wireless!
- Incredibly low latency screen capture
- Support for capturing audio from any sound device – input or output – fully synchronized with the video signal
- Full remote KVM solution, allowing remote control of keyboard, mouse, clipboard and even touch from a remote machine
- Full control over the video bandwidth, resolution, and frame-rate being used
How to reduce latency in NDI
In the video encode settings of the webinterface you will find different settings. Please set
- Disable the substream
- Encode mode: H.264*
- Profile: HP
- Resolution: Choose the same resolution as your project in for e.g. vMix
- Set bitrate between 4096 and 1640
- Framerate: Choose the same frame rate as your project in for e.g vMix
- Bitrate control: Constant bitrate
- I-Frame interval: set to the double of the framerate. If framerate is 50 I-Frame should be 100.
Encoding NDI with H.265
The Everet cameras also support encoding NDI with H.265. Please follow instructions below if you are using vMix. If you are using windows you need to download the HEVC APP from the MS store at first.
1. Install the NDI Tools with the NDI version you wish to use.
https://www.ndi.tv/tools/#download-tools
2. Locate the runtime directory and copy Processing.NDI.Lib.x64.dll to the desktop.
In the case of NDI 4.5 this will be the following:
C:\Program Files\NewTek\NDI 4 Runtime\v4
3. Rename the file on the desktop to Processing.NDI.Lib.dll
4. Copy the file into the C:\Program Files (x86)\vMix\ndi\x64 directory, replacing the existing file.
5. vMix will now use the updated NDI version.
NOTE: These steps will need to be repeated each time the vMix version is updated, as it will overwrite the file each time.