User Manual EVC400
Everet EVC400 Smart Video Conference Camera

Before Use
- The EVERET EVC400 is a professional AI powered 4K conference camera with genius auto-framing, dual beam forming microphone and 120° wide-angle video designed for huddle rooms and small meeting rooms.
- Before operation, please fully read and follow all instructions in the manual.
- When the IR controller is connected, operations can perform smoothly.
- The camera power voltage is 4.4~5.25V@500mA (USB port)
- Protect all cables, especially the connectors.
- Operational environment: 0℃-50℃, humidity less than 80%. To avoid any danger, do not put anything inside the camera, and keep away from the corrosive liquid.
- Avoid stress, vibration and damp during transportation, storage and installation.
- Do not detach the camera housing and cover. For any service, please contact authorized Everet technicians.
- Do not direct the camera lens towards strong light, such as the sun or intensive light.
- Use a dry and soft cloth to clean the camera housing applied with neutral cleaning agent when needed. To avoid damage on the camera lens, never use strong or abrasive cleaning agents on the camera housing.
- Put the camera on a fixed and smooth desk or platform.
Note: The video quality may be affected by the specific frequencies of electromagnetic fields.
Packing List
Check all bellow items when you open the package:
| Camera | 1 |
| USB 2.0 Type-B to USB-A Cable | 1 |
| Power Cable | 1 |
| Remote Control | 1 |
Quick Start Guide
- Check if following products are in the box
– Camera
– USB 2.0 Type-B to USB-A Cable
– Remote Control - Power on the camera by connecting the USB 2.0 Type-B to USB-A Cable to your laptop or PC.
- Check if you get video output in your conferencing application.
- Check if you can Zoom in and Zoom out with the IR remote controller.
Key Features
- Ultra crystal video quality with advanced AI to support auto framing of participants at meeting
- 1/2.8” 8.42 MP Sony sensor, high quality 12MP optical full glass lens
- 3840×2160@30 UHD resolution
- Mirror, Flip and Anti-flicker feature
- 4x digital zoom, 120 degree view angle without distortion
- Built-in dual microphone, pick up distance 5m
- Single USB cable for video output, camera control and power supply
- Image flip for upside down installation
- UVC control via USB port with virtually any video conferencing application
- Remote control for menu, ePTZ functions, Presets and Auto framing on/off/trigger
- 3 year warranty
Specifications
| Camera | EVC400 |
| Sensor | Sony 1/2.8 inch 8.42 MP CMOS sensor |
| Video | |
| Video interface | USB 2.0 |
| Video format | |
| USB 2.0 | YUY2/NV12 1280*720@15 1024*576@20 640*480@30 MJPG 3840*2160@30 2560*1440@30 1920*1080@30 1280*720@30 1024*576@30 640*480@30 H.264/H.265 3840*2160@30 2560*1440@30 1920*1080@30 1280*720@30 1024*576@30 640*480@30 |
| Audio | |
| Microphone | Built-in dual beam forming microphone, pick up voice at 5meters distance |
| Lens | |
| Lens | 12-megapixel fixed lens |
| Focal Length | f=2.20mm |
| Digital Zoom | 4x |
| Field of View | 120° |
| PTZ | |
| ePTZ | Yes |
| Presets | IR Remote: 3 |
| Auto framing | Yes (auto/manual/push) |
| Image | |
| Shutter Speed | 1/30 – 1/10000s |
| Iris | F=2.2 |
| Distance | 3~5 meters |
| Video S/N Ratio | >50dB |
| Minimum Illumination | 0.01 lux |
| Focus | Auto |
| Gain Level | 0-15 |
| White Balance Modes | Auto/ Manual |
| Exposure Modes | Auto / Manual |
| Gamma | 0-15 |
| Anti-Flicker | OFF / 50Hz / 60Hz |
| 3D NR | OFF / Auto / Level 1-4 |
| 2D NR | Yes |
| DEFOG | Yes |
| Image Flip | Yes |
| Image Mirror | Yes |
| Back Light Compensation | Yes |
| Control | |
| IR Remote | Yes |
| USB | USB2.0 (UVC1.1/UAC1.0) |
| General | |
| Environment | Indoor |
| Operating Temperature | -10℃~50℃ |
| Operating Humidity | ≤80% |
| Power input | 4.4~5.25V@500mA (USB port) |
| Dimensions (LxWxH) | 199mm×92.5mm×65mm |
| Weight | 0.32 KG |
| Color | Black |
| EAN | 8720387387014 |
IR Remote Control
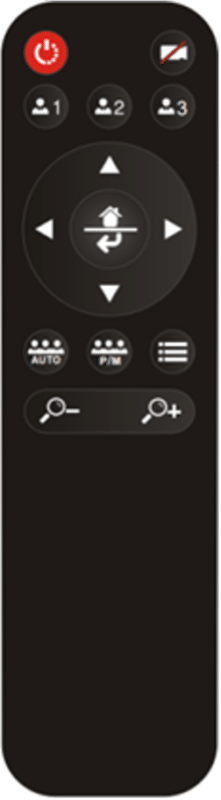
| Buttons | Description |
 | Power: Standby/Start camera. (This button is temporarily disabled.) Image: on/off. |
| Preset: long press for 3 seconds to save the current position to the corresponding preset, short press to run the preset, only available in manual mode | |
 | Navigation keys: up and down, left and right. In manual working mode, these keys are used to adjust the position of the ePTZ (electronic pan/tilt/zoom) and to select menu items after entering the menu. |
 | Home/Confirm key: In manual working mode, a short press returns the electric pan/tilt/zoom to the home wide angle position |
| Auto: Turn on Auto Framing. Push/Manual: Switch the manual mode or press for One push Auto frame when already in manual mode. Menu: Press to open OSD menu | |
| Zoom keys: +/- Adjust the magnification of the electronic zoom, only available when Auto Framing is closed. |
OSD Menu
- In normal working mode, press the menu button on the IR remote, to enter the OSD menu; press the menu button again to exit and save modified parameters.
- Use the navigate button to select the main menu. The main menu will change to blue colour background, and the right side will show all parameters under this sub menu.
- Once in the sub menu, press the up/down navigate button to select the sub menu, use left/right navigate button to set the parameter.
- If you need to return back the main OSD menu, navigate to the “return” label and press the left key to get back to previous menu. It’s also possible to press the menu button.
- Press OSD button
again to exit the menu.
System
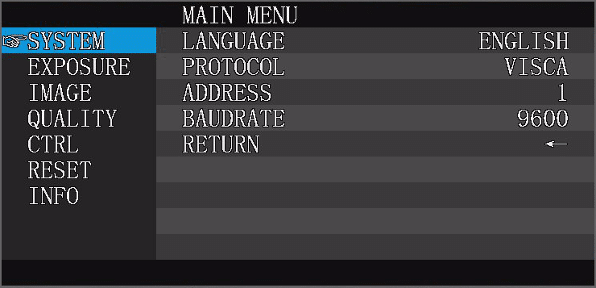
| LANGUAGE | ENGLISH | |
| PROTOCOL | VISCA | Default: VISCA |
| ADDRESS | VISCA:1~7 | Default: 1 |
| BAUDRATE | 2400,4800,9600,115200 optional | Default: 9600 |
| RETURN | Back to the main menu |
Exposure
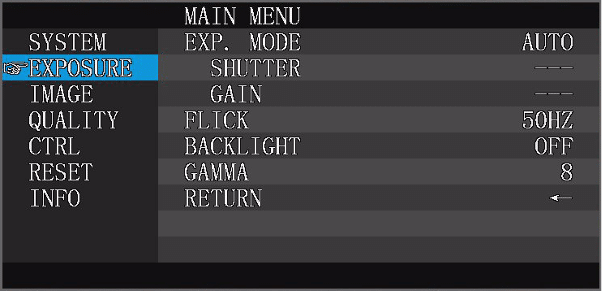
| EXP.MODE MODE | AUTO/MANUAL | Default: AUTO |
| SHUTTER | Shutter speed:1/30~1/10000, only valid under MANUAL mode | Default: 1/100 |
| GAIN | Gain setting:0~15, only valid under MANUAL mode | Default: 0 |
| FLICK | OFF/50HZ/60HZ | Default: 50HZ |
| BACKLIGHT | ON/OFF | Default: OFF |
| GAMMA | 0~15 | Default: 8 |
| RETURN | Back to the main menu |
Auto Exposure Mode
When the camera is in AE (Auto Exposure) mode the camera will regulate the all the exposure settings itself to create the best image.
Shutter Speed
In manual mode the shutter speed can be adjusted. To choose the right Shutter speed you can use the 180 rule. The 180 degree shutter rule is a popular guideline among video makers for setting the shutter speed for proper exposure. It states that the shutter speed should be set at double the frame rate of the video being shot. For example, if a filmmaker is shooting video at 30 frames per second, the shutter speed should be set to 1/60th of a second in order to achieve proper exposure. This shutter speed creates a shutter angle of 180 degrees, hence the name of the rule. This rule has become a standard in the film industry to match what the human eye is used to seeing in real life.
Gain
Gain is an electronic light amplification of the video signal. This means that the light is boosted electronically, adding more voltage to the pixels on your image causing them to amplify their intensity and therefore brighten your image. This will result in a brighter image in conditions that wouldn’t normally allow it, like when there is insufficient light. The contrary of Gain is noise. The higher the Gain is set the more noise will occur.
Flick
Anti-Flicker is a feature that helps reduce or eliminate flickering images caused by fluorescent or other artificial lighting sources. It works by adjusting the shutter speed to match the frequency of the artificial light source. This helps to reduce the amount of flickering that occurs in the images.
Backlight
Backlight compensation adjusts the exposure to compensate for overly bright background light. It is used to ensure that the main object is properly exposed and not lost in the shadows due to the intense background lighting. Backlight compensation works by increasing the exposure of the foreground and allowing more light to hit the object. This setting can be enabled or disabled.
Gamma
Gamma is a setting that adjusts the contrast of an image. It is typically used to make subtle adjustments to the midtones and shadows of an image. It is an important tool to fine-tune the overall look of an image. When adjusting the gamma of a camera, the result is a change in the level of brightness of midtones and shadows. If the gamma is too high, the overall image may appear washed out and lack contrast. If the gamma is too low, the image may appear too dark and lack detail in the midtones and shadows.
Image
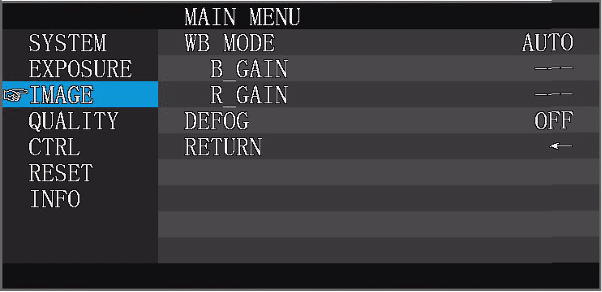
| WB MODE | AUTO/MANUAL | Default: AUTO |
| B_GAIN | Blue gain level:0~256, only valid under manual white balance mode | Default: 100 |
| R_GAIN | Red gain level:0~256, only valid under manual white balance mode | Default: 100 |
| DEFOG | Set the image permeability: OFF/1~15 | Default: OFF |
| RETURN | Back to the main menu |
Auto White Balance
When the camera is set to auto white balance settings, it assumes that the light source is a neutral white. This means that the colors in the scene will be rendered accurately. However, if the light source is not neutral white, then the colors in the scene may be rendered inaccurately. In that case, the white balance settings should be manually adjusted to ensure that the colors in the scene appear as they should.
DEFOG
DEFOG reduces the effects of fog, mist, and other forms of moisture on the image being captured. It uses an infrared filter to block out the fog and mist, allowing the camera to capture a clearer image.
Quality
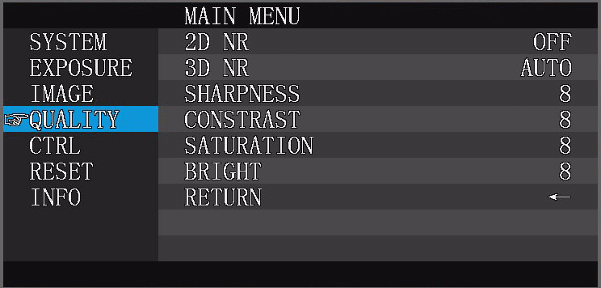
| 2D NR | Set 2D noise reduction level: ON/OFF | Default: OFF |
| 3D NR | Set 3D noise reduction level: OFF/AUTO/1~4 | Default: AUTO |
| SHARPNESS | Sharpness setting:0~15 the higher value, the clearer of image shape | Default: 8 |
| CONTRAST | Contrast setting:0~15 | Default: 8 |
| SATURATION | Saturation setting:0~15 | Default: 8 |
| BRIGHT | Bright setting:0~15 | Default: 8 |
| RETURN | Back to the main menu |
2D Noise Reduction
2D digital noise reduction is the simplest way to reduce video noise. It uses the temporal method for reducing noise. It compares pixels and removes ones that don’t appear in every frame. These irregular pixels are considered image noise. 2D Noise Reduction works best with low-resolution footage. With higher resolution footage, this method is virtually ineffective. While effective, this form of noise reduction can blur images or leave movement trails.
3D Noise Reduction
3D digital noise reduction uses an algorithm to compare pixels in a sequence of frames. First, it analyzes the pixels in each frame, and then it compares the frames to see which pixels move or change. It is highly effective at isolating pixels considered noise and generally better at eliminating that grainy look common with low-light video. 3D is also the better choice for videos with lots of motion because it does not create motion blur like 2D DNR. Additionally, 3D DNR works well on high-resolution footage, whereas 2D does not.
Sharpness
The camera sharpness is a measure of the quality of an image that is captured. It is determined by the level of detail that is present in an image, as well as the clarity of the image. A sharp image will have crisp edges and accurate color representation, while a blurry image will appear soft and may not have accurate color representation. You can adjust the level of sharpness according to your video scene.
Contrast
Camera contrast It helps to make the video image more dynamic and interesting. It refers to the difference in brightness between different parts of the image. A higher contrast video image brings out more details and textures combined with intense dark and light areas, while a lower contrast video image will have a more subtle and calming effect.
Saturation
Saturation is the density of a color. Higher saturation makes the colors appear richer, while lower saturation makes it appear paler.
Brightness
Brightness is a term used to describe the overall light intensity of the image and is used to adjust the overall level of brightness of the image.
Control / Auto Framing
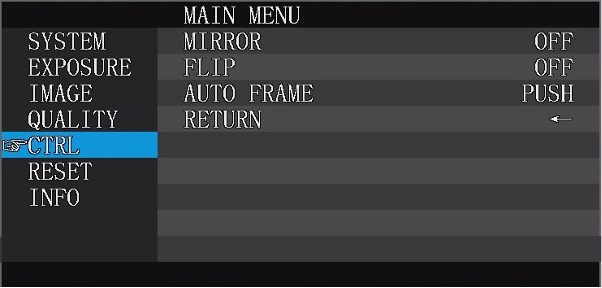
| MIRROR | Default: OFF |
| FLIP | Default: OFF |
| AUTO FRAME | Auto/manual/push |
| RETURN | Return to previous menu |
Auto framing
Auto framing is a technology used by cameras to keep a person or object in the centre of a frame and maintain the same size as the person or object moves. The technology works by using facial recognition, tracking and other algorithms to recognize a person or object in the centre of the frame and then use the camera’s intelligent motion detection to adjust the framing accordingly.
Auto
In auto mode the camera will automatically do auto framing in the room where it is placed.
Manual
In manual mode the camera works as an ePTZ camera. You will be able to manually zoom in/out and move the image up/down/left and right.
Push
This function can be used in manual mode to directly do auto framing when you press the p/m button on the IR remote control.
Reset
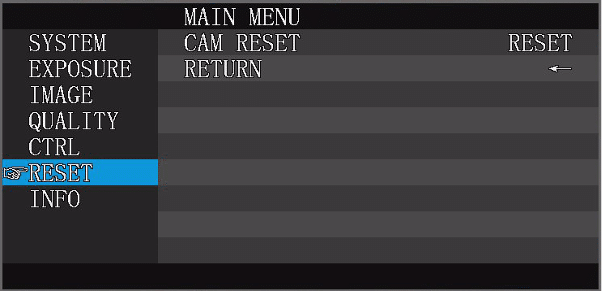
| CAM RESET | Reset camera parameter to default settings |
| RETURN | Return to the previous menu |
Info
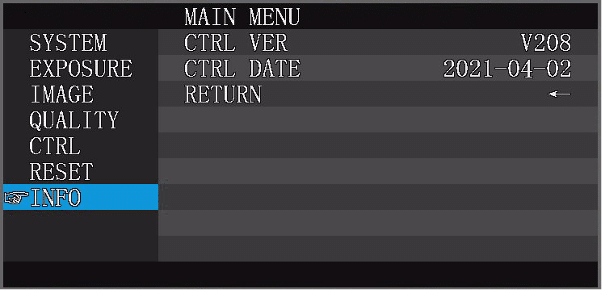
| CTRL VER | Camera movement control program version |
| CTRL DATE | Release date of camera movement control program |
| RETURN | Back to the main menu |